
Are you ready to cut a design out of your adhesive or heat transfer vinyl sheets or rolls for your next project?

Before you get started, it is important to research and test which setting on your machine (like a Cricut or Silhouette) will give you the best cut so your design is easy to weed and apply.
However, before we recommend the cut settings for materials from iCraftVinyl.com, we just want to note that the following suggested cut settings are just a guide for material from iCraft. Every machine is different and there are so many other variables that can impact the quality of your cut, like how sharp your blade is or the stickiness of your cutting mat. Test cuts will be your best friend as you get started with any new product.
Test Cut
What exactly is a test cut? Let us give you some insight.
If you cut your vinyl or heat transfer vinyl on the wrong setting, it could result in a lot of frustration when you go to weed it, and possibly even wasted material. Alternatively, the cut could also be too deep, resulting in the HTV carrier sheet being cut in addition to the vinyl, which can make it a little harder - and sometime impossible - to weed.
It is important to find the setting that cuts your vinyl just enough where it cuts the material but leaves the carrier sheet intact. This is where the test cut comes in. If you have a Silhouette, there is a setting in the cutters’ software that will cut a square with a triangle inside with your selected settings. If you have a different cutter, like a Cricut, design a small shape or letter in you cutter’s software and use our recommendations as your starting place to determine if the cut setting will work for the material you selected. Both the inside and outside of your designs should separate from the rest of the design and the backing easily.
How to Cut Heat Transfer Vinyl
Now that you've tested your setting and you're ready to cut your design, there are a couple more things to note. Before you cut your heat transfer vinyl, make sure you mirror your design in your software. Next you have to load it on to your nat to be fed in the machine. All of our different HTV materials come with the carrier sheet attached. The clear carrier sheet keeps your design in place while you weed out the negative material, and it allows you to transfer multiple pieces to your garment in one press.

When cutting HTV, place the carrier sheet side down on your mat (which is the pretty shiny side). This ensures you cut through the material, but not the carrier sheet. You will then load the cutting mat with your material into your machine as prompted, before selecting the correct setting and sending it to be cut.
All of our heat transfer vinyl materials will be mirrored and applied shiny side down except for our patterned heat transfer vinyl. Since this material is custom printed in-house to order, the carrier sheet does not come attached. You will need to pick up some Heat Transfer Mask separately.
How to Cut Adhesive Vinyl
Since adhesive vinyl does not have a carrier or transfer tape attached, you do NOT need to mirror this material. Place your sheet on your mat with the colored side (or design side) facing you. You will then load the cutting mat with your material into your machine as prompted before selecting the correct setting and pressing cut. Make sure you purchase some transfer tape separately so you can remove your design from the backing so it can be applied to your medium of choice.
iCraftVinyl Vinyl Cut Settings Guide for Cricut & Silhouette
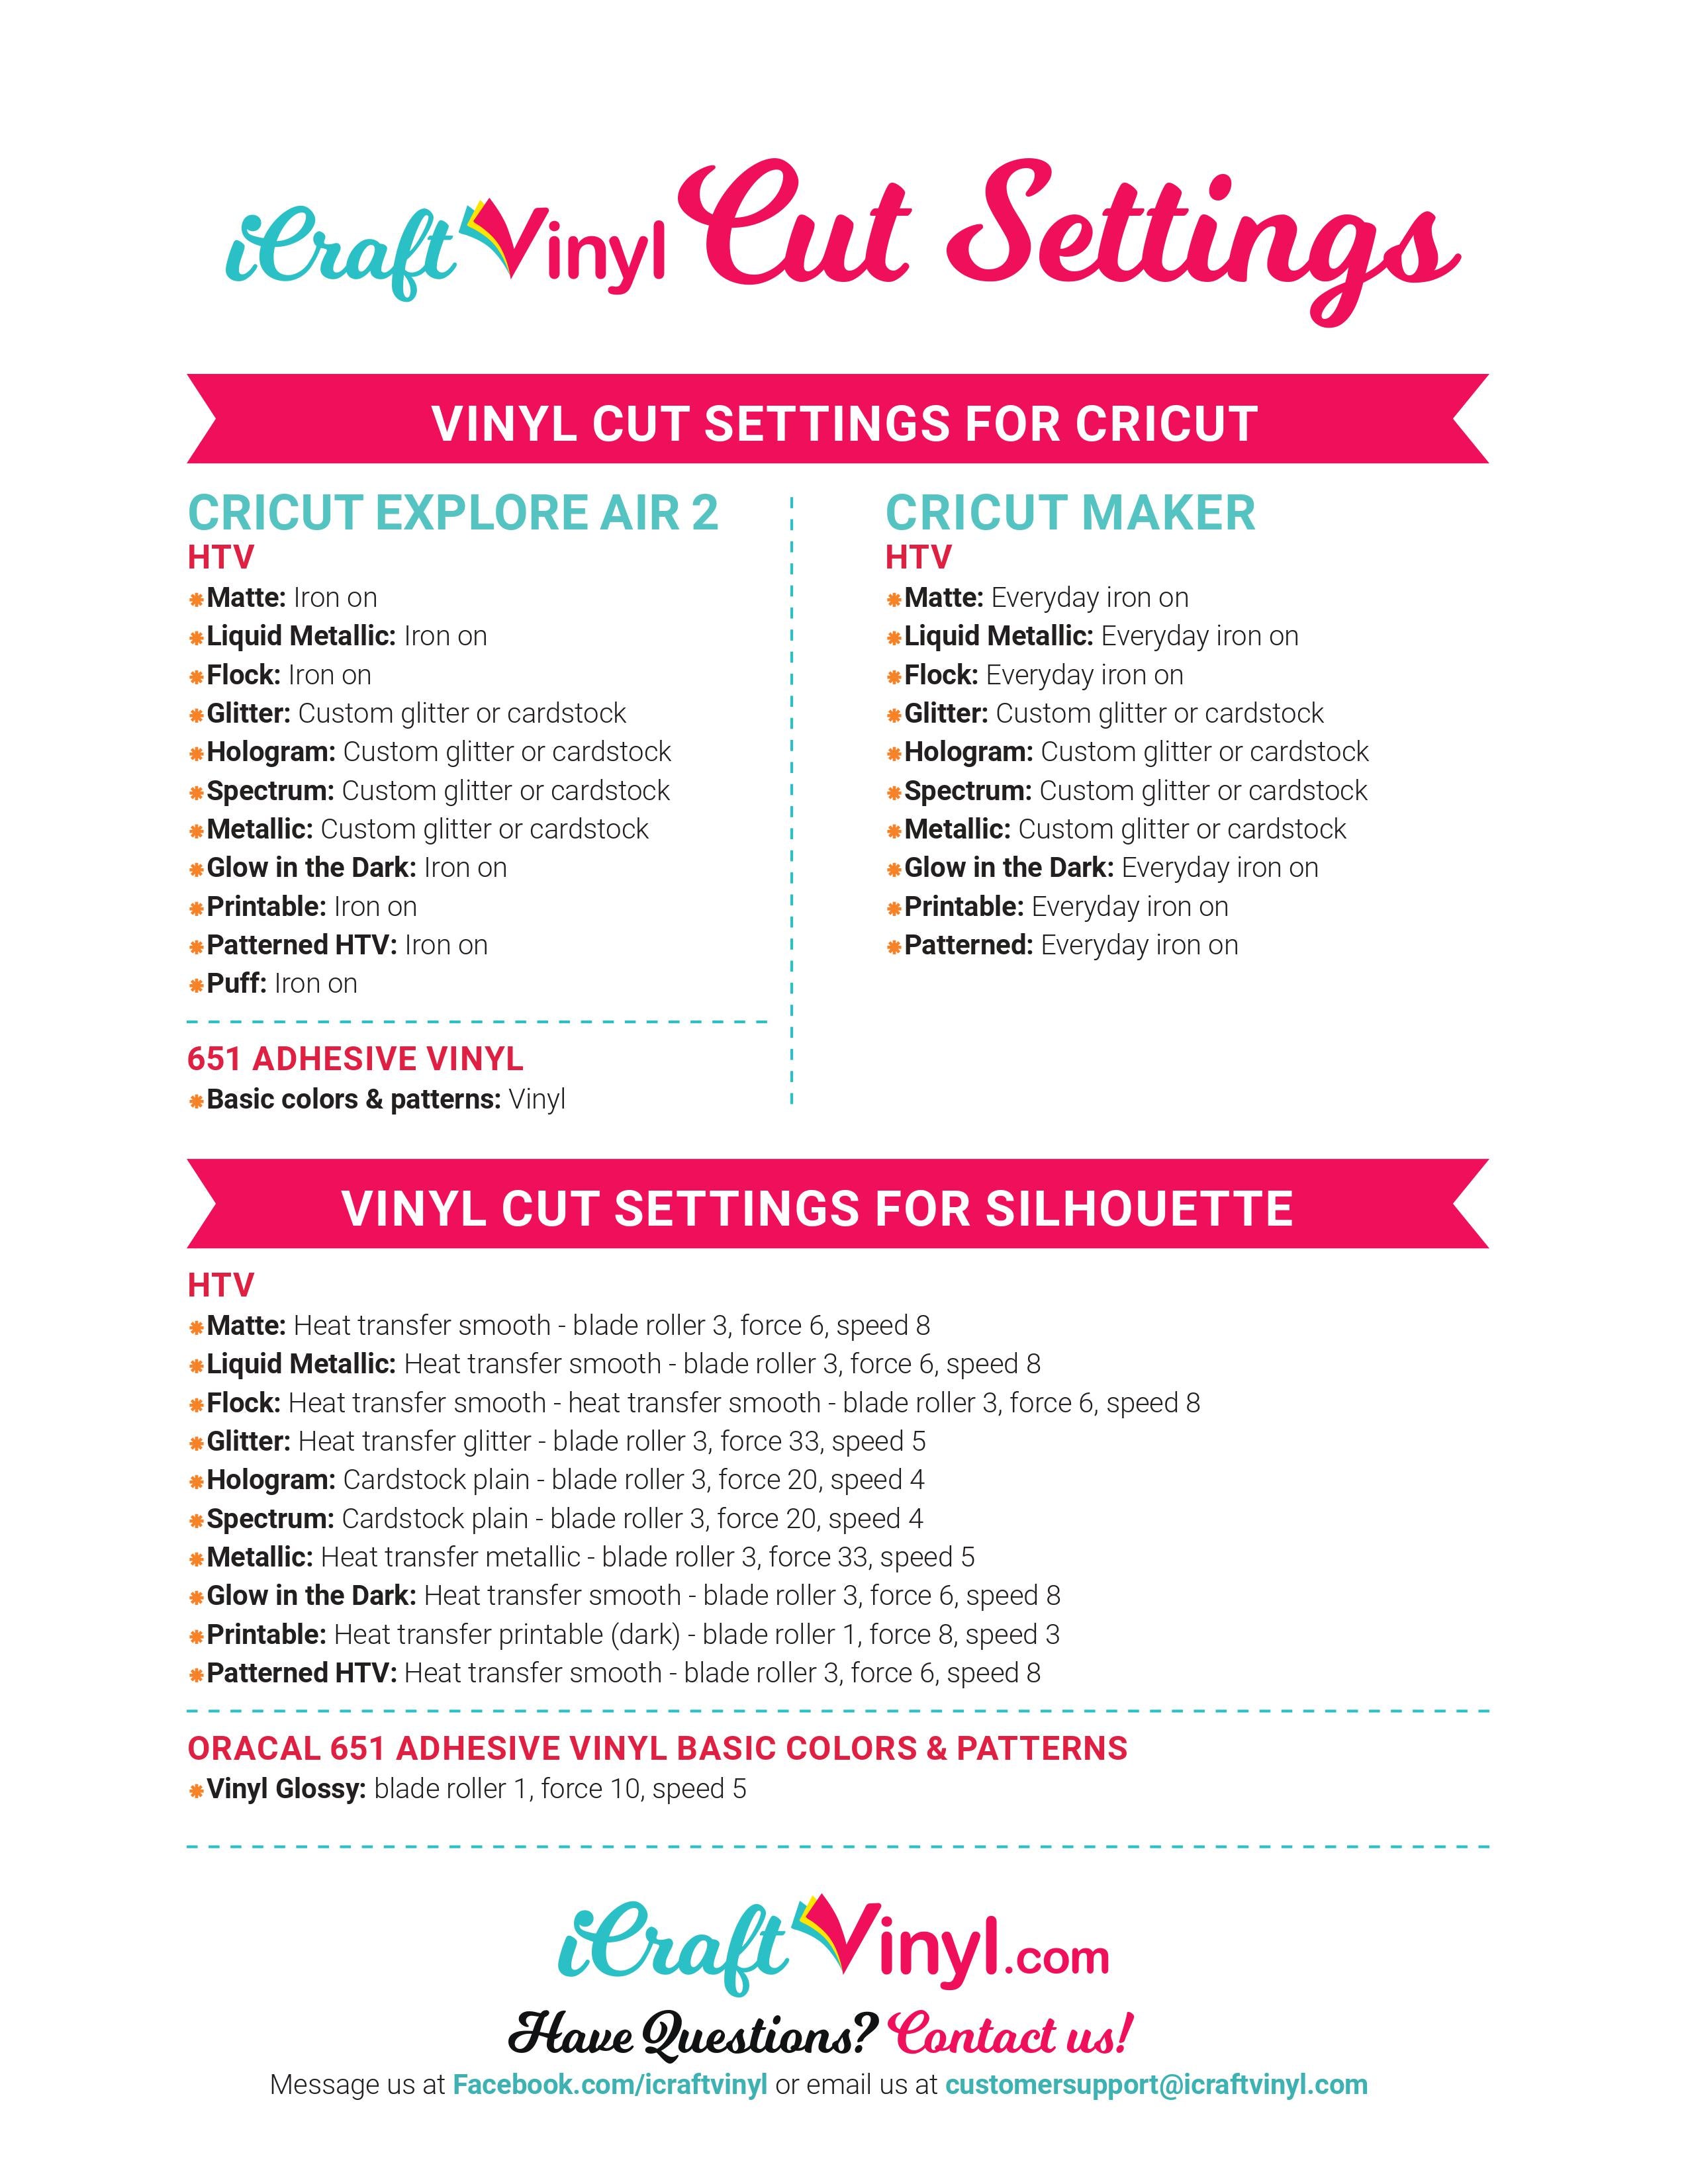
Vinyl Cut Settings for Cricut
Cricut Explore Air 2
HTV
- Matte: Iron on
- Liquid Metallic: Iron on
- Flock: Iron on
- Glitter: Custom glitter or cardstock
- Hologram: Custom glitter or cardstock
- Spectrum: Custom glitter or cardstock
- Metallic: Custom glitter or cardstock
- Glow in the Dark: Iron on
- Printable: Iron on
- Patterned HTV: Iron on
- Puff: Iron on
651 Adhesive vinyl
- Basic colors & patterns: Vinyl
Cricut Maker
HTV
- Matte - everyday iron on
- Liquid Metallic - everyday iron on
- Flock - everyday iron on
- Glitter - Custom glitter or cardstock
- Hologram - Custom glitter or cardstock
- Spectrum - Custom glitter or cardstock
- Metallic - Custom glitter or cardstock
- Glow in the Dark - everyday iron on
- Printable -everyday iron on
- Patterned -everyday iron on
Vinyl Cut Settings for Silhouette
HTV
- Matte - heat transfer smooth - blade roller 3, force 6 speed 8
- Liquid Metallic - - heat transfer smooth - blade roller 3, force 6 speed 8
- Flock - heat transfer smooth - heat transfer smooth - blade roller 3, force 6 speed 8
- Glitter - heat transfer glitter - blade roller 3, force 33, speed 5
- Hologram - cardstock plain - blade roller 3, force 20, seed 4
- Spectrum - cardstock plain - blade roller 3, force 20, seed 4
- Metallic - heat transfer metallic - blade roller 3, force 33, speed 5
- Glow in the Dark - heat transfer smooth - blade roller 3, force 6 speed 8
- Printable - Heat transfer printable (dark) blade roller 1, force 8, speed 3
- Patterned HTV - heat transfer smooth - blade roller 3, force 6 speed 8
Oracal 651 Adhesive Vinyl basic colors & patterns
- Vinyl glossy - blade roller 1, force 10, speed 5
Remember, these cut setting are just a guide. Use them as a place to start when figuring out the best selections for your individual machine and set up.
If you want to ask real crafters who work with our products what settings they use, be sure to join our Facebook group. You will also get daily inspiration and access to all of our sales!
Join here: https://bit.ly/3u0TP2e
If you have any other questions about iCraft or our products, send us a message to facebook.com/icraftvinyl
